Is Your Awning Loose?
Why would you want to do this?- Any RV owner who uses his awning very often will eventually need to do this little project. What you will see is either the time will come when the fabric does not stay taunt when extended, it no longer rolls up tightly, or it may be that the awning is slow to roll and needs encouragement from the operator. Any of these can be caused by stretching of the springs in the roller. That is quite normal and if you go to an RV repair shop, what this describes is exactly what most shops will do to solve the problem.
What make of awning is this?- While my awning is an A&E, model 8500, this should work just as well on any A&E awning and I think that you can adapt it to a CareFree or other manufacturer. This procedure took me 20 minutes for the front spring and 10 minutes for the rear. I think that I could do more now at about 5 to 10 minutes each. It is not a difficult thing to do.
Tools needed: Screwdriver or nut-driver, on mine it was a square drive but some also have a philips head. You will also need a 6' or 8' step ladder to prop up the awning and an assistant would be very helpful.
Definitions: The “roller tube” is what contains the springs and is what the awning wraps around. The "support arms" are the aluminum members that extend from the awning tube to the bracket on the side of the MH (3.5’ feet above the ground). The "tension arms" are what you adjust to make the awning taut after it has been lowered.
1) Lower the awning, so the roller tube is as close to the ground as possible.
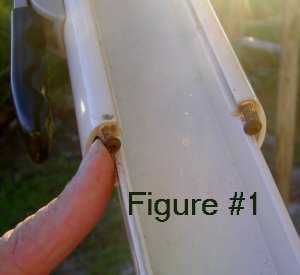
2) The support arm consists of an outer and inner section. Remove the 2 Phillips head screws from the bottom end of the outer section. These are "stops" that keep the tension arm in its channel. (see figure #1)
3) Place the step ladder under the roller tube and adjust the awing to rest on it to support the weight.
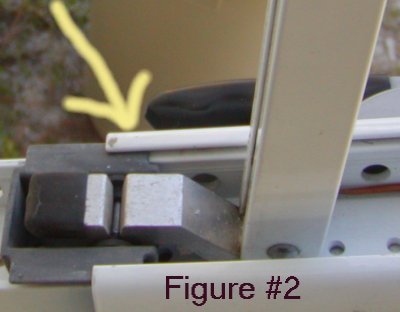
4) Slide the tension arm out of its channel in the outer section and tighten its knob, so it can hang next to the MH without its inner section coming out. (see figure #2)
4) With your assistant holding the roller tube on the step ladder(it will want to move toward the MH), remove the support arm from the bracket on the MH, just like you'd do if you were going to use it in the carport mode. At this point you can remove the inner part of the support arm to make it shorter, or retract it all of the way to the shortest position. If your step ladder is more than 6' tall, don't bother to remove the inside section.
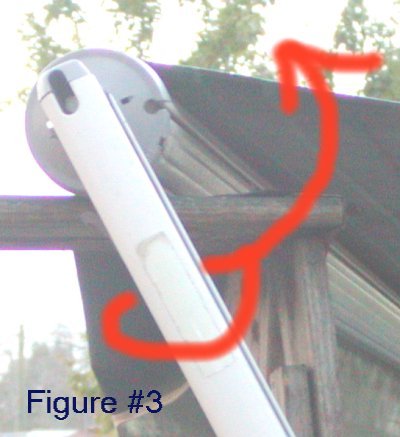
5) If you remove the center section you’re now left with just the 5' section of outer support arm. If you do not it will be a little more than 6' long. With your back to the front of the MH, rotate it counterclockwise one or more revolutions. One was plenty for mine and I would do no more than two revolutions before trying it. You do not want to get it too tight and it takes only a few extra minutes to roll the awning up without replacing the screws. Just snap the support arm back into it's bracket and slide the tension arm into it's slot, and roll it up. No big deal and it will avoid too much tension.
6) Reinsert the inner support arm section and attach it to the MH bracket.
7) Slide the tension arm back in its channel in the outer support arm section and re-install the 2 Phillips head screws that serve as its stop.
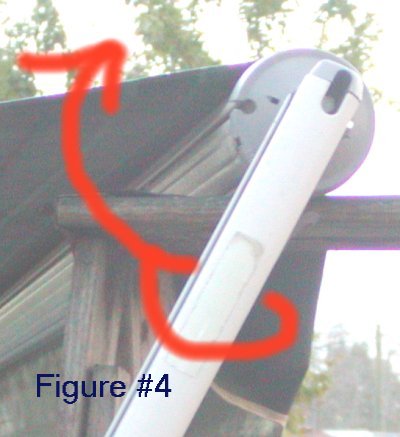
8) Repeat procedure for the rear support arm. You will tension this spring by facing toward the front of the MH and turning the support arm clockwise.
9) Adjust the awning to a nice position to sit under, get a lawn chair and a favorite drink and sit back and admire you handiwork. It would also be helpful if your assistant would call all of your neighbors to hear about how great you are!
10) Now the most important step of all! Get a lawn chair and a cold drink and sit back and admire the results of your skilled craftsmanship.


